Here is a pattern that looks kind of cute for someone who has a baby or toddler...
As with many early patterns, the directions are very 'sketchy' and require lots of expereince to translate them into something actually understandable and do-able. My adaptations are italicized in brackets after sections that I thought might be confusing. After I actually try knnitting this pattern, Ill post the original pattern first and then my modern adaptation second, so that re-enactors can use the original pattern as is, without my interruptions.
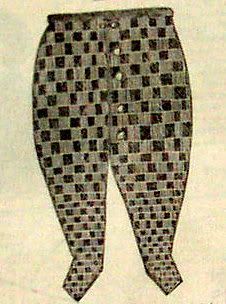
1865 Baby Bumpers
There aren't any babies in my life at the moment, but if there were, this is what I'd make them: knitted "drawers" from the 1865 Peterson's Magazine...
Materials: One oz double zephyr [sport or DK weight]; pair wooden needles, about one quarter of an inch thick [size 9 or 10 US]; pair No. 10 steel needles [I believe this means a set of 4 #10 sock needles].
Cast on 60 stitches
1st row - knit plain
2nd row - purl
3rd row - knit plain
4th row – purl; repeat this until you have knitted 24 rows. [meaning stockinette stitch over 24 rows]
25th row - take off the first stitch without knitting, then bring the thread forward and knit one [meaning slip 1, YO, K1; this increases your stitches to 120 total] Repeat this to the end of the needle.
26th row - knit plain
27th row - purl
28th row - knit plain
29th row - purl. repeat until you have 12 rows.
Put 15 stitches plain for each side of the front,[meaning put 15 st on a holder] and knit the center stitches of the back in blocks of 4 stitches each, that is, knit 4 stitches plain. then 4 stitches purl, (allowing 13 stitches purled for the center of the back). Repeat this until you have 3 rows knit.
The 15 stitches for the fronts are not to be knitted in the three rows just described; the back only to be knit, in order to make the back 3 rows longer than the fronts. [meaning make short rows for the back seat… it doesn’t say to, but I would suggest wrapping the ends of rows with a simple *sl 1, bring yarn front or back (whichever it isn’t), turn, sl 1, proceed w directions as written* to prevent a flap that you will have to gather or overlap. Of course, if you want to make a seat flap that buttons closed, and can be opened, you can omit the end-row wraps and create an overlapping square on top and bottom of the back seat.]
Seam or purl 1 row between every block. [meaning, after knitting in pattern across the back, knitting the center 13 st plain, wrap and turn, then purl back. Repeat these two rows two more times for a total of six rows – 3 pattern rows and 3 purl rows.]
Make two blocks in this way for the back, and knit to the end of the needle in the seam. [meaning, repeat these 6 rows once more, ending with a WS purl row that purls the 15 stitches of one front side off the holder].
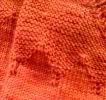
NOTE: As in the illustration, the ‘blocks’ are meant to alternate over each other, so the first section of 6 rows is K4, P4, purling every other row. The second set of 6 rows will be P4, K4, purling every other row.
Then knit in blocks all the way out, [meaning, knit in pattern, remembering to knit the first 15 stitches on the front, and the center 13 stitches on the back, and then after knitting in pattern again, knit the last 15 stitches off their holder] (observing to make the blocks come out evenly one over the other,) picking up 4 stitches on each side where you have knit the back longer. [This pick-up will make a somewhat lumpy back, hence the suggested short rows earlier. However, it will make the back pouch out a little bit if you want to go ahead and use the authentic 1865 directions as written.]
Continue these blocks until you have 13 ribs or rows of blocks [26 rows total because the pattern row & purl back row = 1 rib or row.]
In the middle of the back, in the block that has the 13 stitches, narrow 1 stitch in every other block, so that when you have the 13 rows of blacks completed, you will have but 6 stitches in the middle block, which at the beginning had 13 stitches.
Now change the needles, using the steel ones, divide the stitches in half and close the leg by using 4 needles. Knit 4 rows of blocks without narrowing ,[meaning 24 rows total, a pattern and a purl row x 3 equaling 1 “row of blocks”. If you are now knitting in the round on 4 needles, it will be a pattern row and a knit row to equal 1 block row and 3 of these equal 1 block.] then knit 12 rows of blocks, narrowing 1 stitch in every row of blocks in the inside of the leg, then knit 4 rows of blocks without narrowing.
Then take the 12 center stitches for the top of the foot and knit 3 rows of blocks, pick up all the stitches around the foot and knit plain 1 row, purl 1 row, knit plain 1 row, purl 1 row. Bind off. Do the other leg in the same manner.
Then pick up all the stitches (on the right side of the work) in front on both sides and knit 6 rows purl and 6 rows plain alternately. [you are making the front button plackets in stockinette. Obviously, it would be easier to create the buttonholes while knitting one of the sides, than going back and making sewn buttonholes as described below]. Bind off. Hem the right side down and sew 4 large porcelain buttons on it. In the 4th row of the left side you must make 4 buttonholes, and hem the half of the 8 rows down so as to meet the buttonholes.
Hem down the top (at the waist) to the row of holes, and finish with a cord and tassels.


2 comments:
I can't believe I missed this post when you first wrote it. I'm glad that you found the shop and liked what they had. I have such a great time when I make it over there. I've found some great out of print knitting books there-things that I have hunted for.
Yes - that was a great find... Thanks so much for pointing me there - I can't believe I've driven by and never stopped in!
Post a Comment